Service Registration and Discovery in Spring Boot using Eureka : Microservices essentials
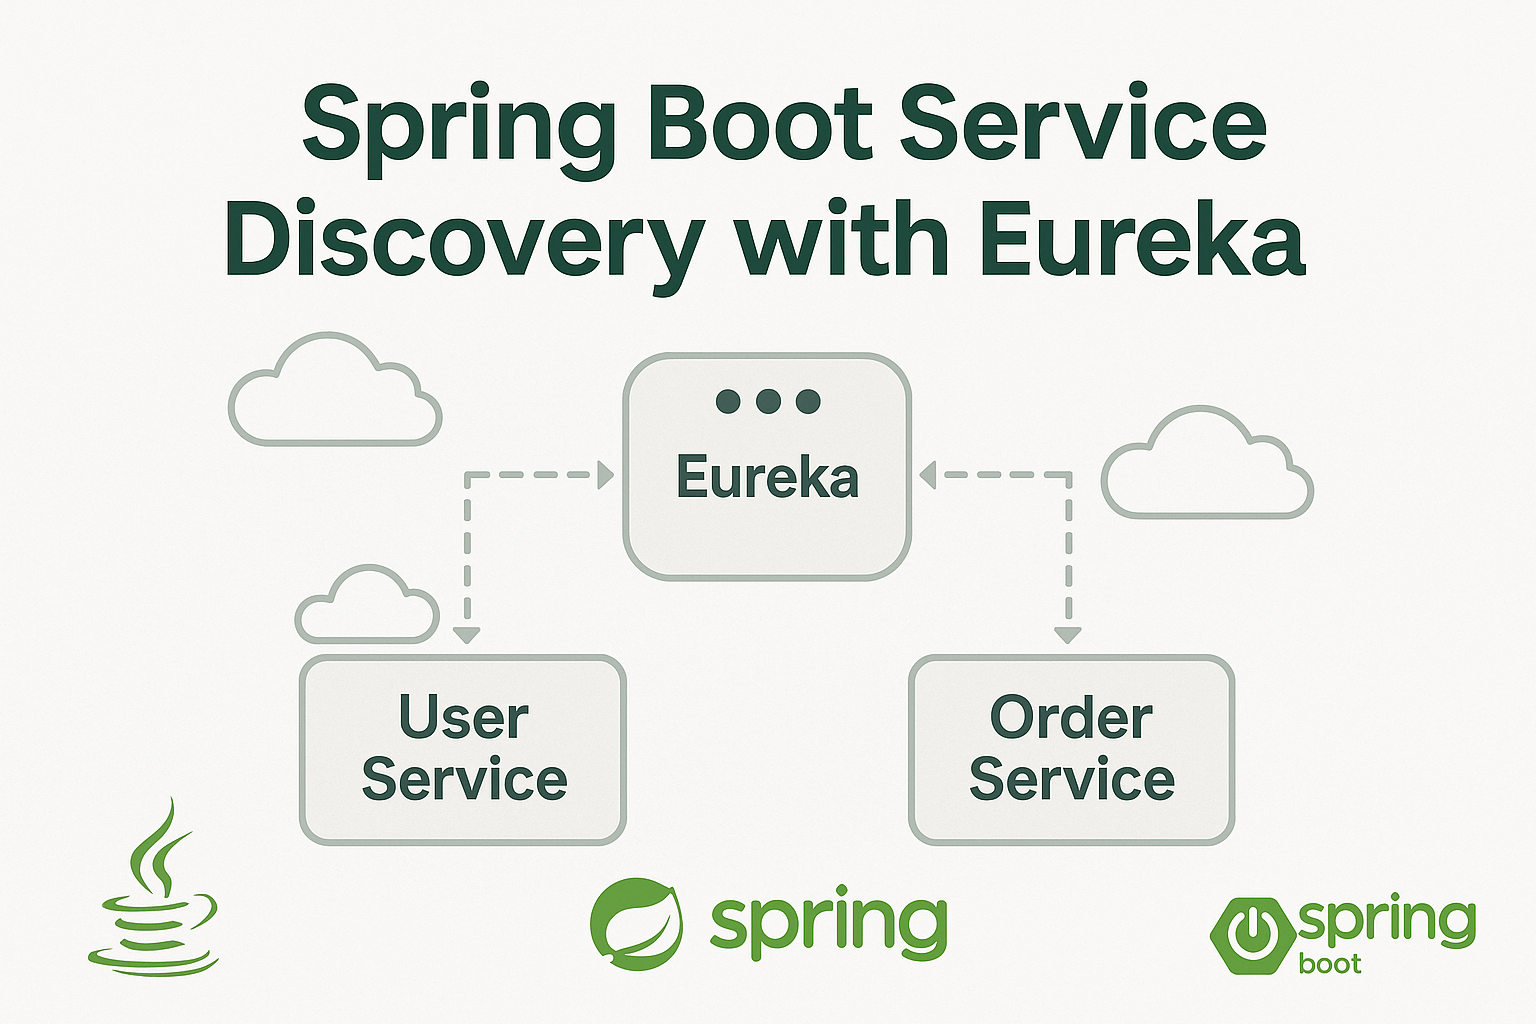
In a microservices architecture, services must locate each other without hardcoded URLs. Service Discovery solves this by registering each service with a centralized registry. One of the most popular tools for this in the Spring ecosystem is Netflix Eureka.
In this tutorial, you will:
- Set up a Eureka Server
- Create a microservice that registers itself
- Verify dynamic discovery
Let’s build it step-by-step.
📦 Project Setup
We’ll create two Spring Boot projects:
eureka-server– service registryuser-service– client microservice that registers itself
Both projects use Spring Boot 3+ and Java 17+
1️⃣ Create Eureka Server
Step 1: Initialize Spring Boot Project
Use Spring Initializr with:
- Project Name: eureka-server
- Dependencies: Spring Web, Eureka Server
Step 2: Add Dependencies
In pom.xml:
<dependencies>
    <dependency>
        <groupId>org.springframework.cloud</groupId>
        <artifactId>spring-cloud-starter-netflix-eureka-server</artifactId>
    </dependency>
    <dependency>
        <groupId>org.springframework.boot</groupId>
        <artifactId>spring-boot-starter-web</artifactId>
    </dependency>
</dependencies>

<dependencyManagement>
    <dependencies>
        <dependency>
            <groupId>org.springframework.cloud</groupId>
            <artifactId>spring-cloud-dependencies</artifactId>
            <version>2022.0.4</version>
            <type>pom</type>
            <scope>import</scope>
        </dependency>
    </dependencies>
</dependencyManagement>
Step 3: Enable Eureka Server
In EurekaServerApplication.java:
@SpringBootApplication
@EnableEurekaServer
public class EurekaServerApplication {
    public static void main(String[] args) {
        SpringApplication.run(EurekaServerApplication.class, args);
    }
}
Step 4: Configure application.properties
Create this file at:
📁 src/main/resources/application.properties
server.port=8761

spring.application.name=eureka-server

eureka.client.register-with-eureka=false
eureka.client.fetch-registry=false
Step 5: Run the Server
Start the application and visit:
📍 http://localhost:876
You’ll see the Eureka dashboard.

2️⃣ Create a Client Microservice (user-service)
Step 1: Initialize Spring Boot Project
Use Spring Initializr with:
- Project Name: user-service
- Dependencies: Spring Web, Eureka Discovery Client
Step 2: Add Dependencies
In pom.xml:
<dependencies>
    <dependency>
        <groupId>org.springframework.cloud</groupId>
        <artifactId>spring-cloud-starter-netflix-eureka-client</artifactId>
    </dependency>
    <dependency>
        <groupId>org.springframework.boot</groupId>
        <artifactId>spring-boot-starter-web</artifactId>
    </dependency>
</dependencies>

<dependencyManagement>
    <dependencies>
        <dependency>
            <groupId>org.springframework.cloud</groupId>
            <artifactId>spring-cloud-dependencies</artifactId>
            <version>2022.0.4</version>
            <type>pom</type>
            <scope>import</scope>
        </dependency>
    </dependencies>
</dependencyManagement>
Step 3: Enable Eureka Client
In UserServiceApplication.java:
@SpringBootApplication// @EnableEurekaClient ❌ NOT needed in Spring Cloud 2022+
@EnableEurekaClient.
public class UserServiceApplication {
public static void main(String[] args) {
SpringApplication.run(UserServiceApplication.class, args);
}
}
As of Spring Cloud 2022+, @EnableEurekaClient is no longer required because Spring Boot auto-configures Eureka clients if the right dependencies and config are present.
Spring Boot auto-discovers the presence of Eureka via the spring-cloud-starter-netflix-eureka-client dependency and applies the needed configuration automatically.
Create UserController.java:
@RestController
@RequestMapping("/users")
public class UserController {
    @GetMapping
    public List<String> getUsers() {
        return List.of("Alice", "Bob", "Charlie");
    }
}
Step 6: Run the Client Microservice
Run UserServiceApplication.
Now check http://localhost:8761 again — user-service should be registered!
✅ Final Test
Open your browser or use Postman:
Call user-service directly:
GET http://localhost:8081/usersCheck Eureka UI:http://localhost:8761 should show user-service as a registered application.
📌 Conclusion
You’ve now successfully set up:
- A fully working Eureka Server
- A Spring Boot microservice that registers itself
This is the first foundational step for building microservices with Spring Boot.


Commands:
mvn clean
mvn install
mvn spring-boot:run
Git code at : https://github.com/infotechseo/microservices-eureka-server


![Building REST APIs with Spring MVC [Java Spring Boot Mastery Series – Part 3]](https://seoinfotech.com/wp-content/uploads/2025/06/jav-spring-boot-mastery--300x200.png)